Docker 镜像运行流程
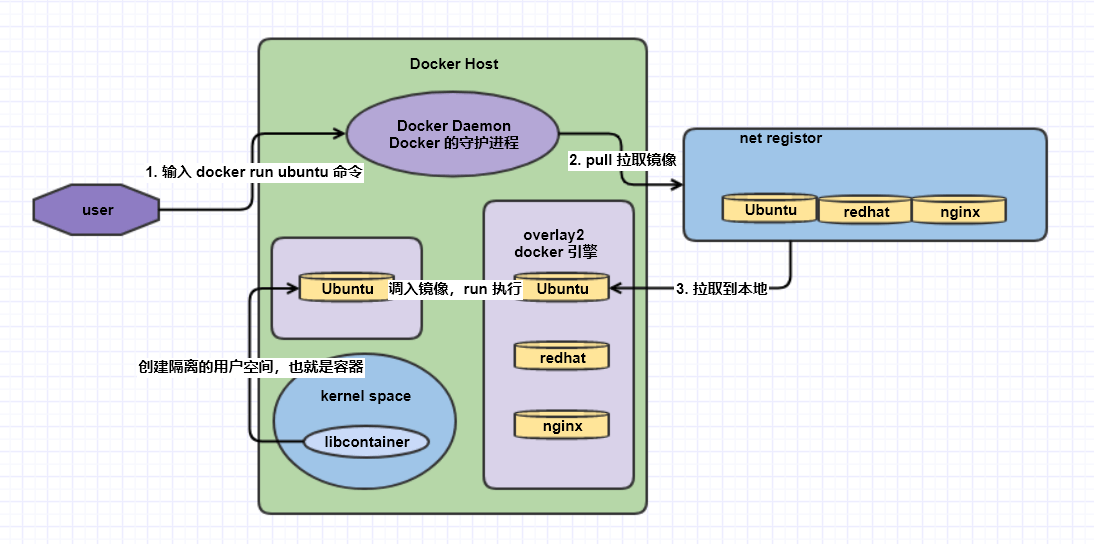 Docker 镜像含有启动容器所需要的文件系统及其内容,因此,其用于创建并启动 Docker 容器
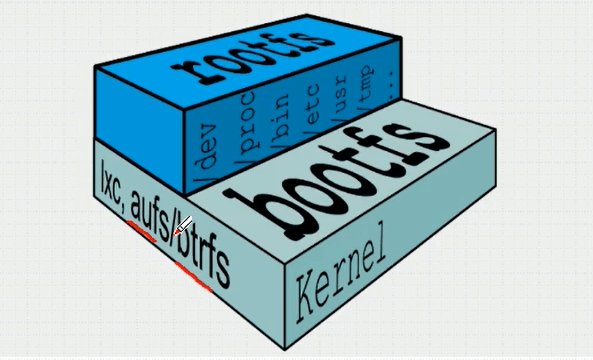
- 采用分层构建机制,最底层为 bootfs,其之为 rootfs,为了确保用户空间可以正常引导
- bootfs:用于系统引导的文件系统,包括 bootloader 和 kernel,在内核中进行构建的,用户使用时是看不到并且体会不到的
- rootfs:位于 bootfs 之上,表现为 Docker 容器的根文件系统
- 传统模式中,系统启动时,内核挂载 rootfs 时会首先将其挂载为只读模式,完整性自检完成后,将其重新挂载为读写模式
- docker 中,rootfs 由内核挂载为只读模式,而后通过联合挂载技术额外挂载一个可写层。
 Docker Image Layer
位于下层的镜像称之为父镜像,最底层的称为基础镜像。
最上层为 “可读写“ 层,其下的均为 ”只读“ 层
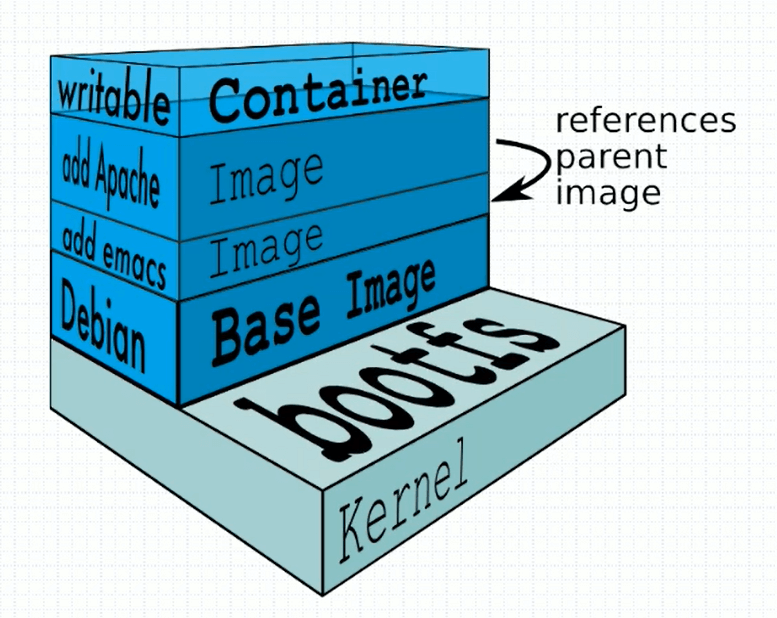 bootloader 层,在内核中,只是为了创建一个容器,并引导容器运行。容器创建完成并引导成功后,那么就会卸载 bootloader 层(在内存中)。
base image 层,是在用户空间中,是一个只读层,是一个基础镜像层。
image 层(add emacs),类似于 vim 的一层
image 层(add apache),是一个应用程序的层,只读层
writable 层,可写层,因为镜像都是只读的,所以当用户在写入或者是修改时,会在这个镜像的上方新建一个写入层。当删除容器时,容器的可写层会一并被删除。
Aufs(Storage Driver)
高级多层统一文件系统,简称 Aufs。前身是 UnionFS,在 2006 年诞生。aufs 一直都不是内核的代码。
Docker 最初使用 aufs 作为容器文件系统层,目前仍然作为存储后端之一来支持。
overlayfs 是 aufs 的竞争版。Docker 的分层镜像,除了 aufs,docker 还支持 btrfs,devicemapper 和 vfs 等。
devicemapper 在联合挂载性能是很差的。
前端和后端都会有文件系统。
Docker Registry
启动容器时,Docker daemon 会视图从本地获取相关的镜像;本地的镜像不存在时,从 Registry 中下载镜像到本地。
默认 Docker Registry 指向的是 Docker hub。
分类
- Sponsor Registry:提供给客户和 Docker 社区使用
- Mirror Registry:只让客户使用,例如阿里加速器
- Vendor Registry:发布的 Docker 镜像的供应商提供的 Registry
- Private Registry:设有防火墙和额外的安全层的私有实体提供的 registry
组成
Repository
分为顶层仓库和用户仓库
顶层仓库是直接有仓库名,一个仓库可以有多个 Tag,但是一个 Tag 只能有一个镜像。
Index
索引,用来搜索镜像,镜像开发人员所制作。供其他人员使用。
云原生
面向云环境去运行程序,而调用了云系统本身的功能,称之为云原生。程序大多数都是通过环境变量来获取数据,并不是通过修改配置文件来获取数据。
向容器启动时传环境变量配置容器的启动。
Docker hub 介绍
Image Repositories 是一个镜像仓库。
Automated Builds 早期使用 Dockerfile 创建镜像,docker hub 会自动监控 github,用户只需要将 dockerfile 上传到 github
webhooks 与 automated builds 配合。
镜像相关操作
生成途径
Dockerfile 基于镜像制作
Docker Hub automated builds
基于容器做镜像
简介
例如安装 nginx 时生成的一个 write 可写层,使用 docker commit 保存这个可写层并生成一个新的镜像。
范例:使用 busybox 制作一个 /data/html 主页,将这个结果做一个镜像
- 启动 busybox 镜像
[root@centos7_10 ~]# docker run --it b1 -it busybox
#默认运行的就是 /bin/bash
- 创建一个网页
/ # mkdir -p /data/html
/ # echo busybox > /data/html/index.html
- 使用
commit制作一个新的镜像
-p 的指令是指定该镜像暂停后制作镜像
[root@centos7_10 ~]# docker commit -p b1
sha256:181c9e842265c6821f13e9e8ca288b51f5208350f97f5284e8f909f26e986dec
- 查看镜像
[root@centos7_10 ~]# docker image ls
REPOSITORY          TAG                 IMAGE ID            CREATED             SIZE
<none>              <none>              181c9e842265        10 seconds ago      1.23MB
- 添加标签
[root@centos7_10 ~]# docker tag 181c9e842265 dingchen/httpd:v0.1-1
[root@centos7_10 ~]# docker image ls
REPOSITORY          TAG                 IMAGE ID            CREATED             SIZE
dingchen/httpd      v0.1-1              181c9e842265        2 minutes ago       1.23M
- 添加一个新的标签
添加后出现的内容,IMAGE ID 相同,并且为同一个镜像。
[root@centos7_10 ~]# docker tag dingchen/httpd:v0.1-1 dingchen/latest
[root@centos7_10 ~]# docker image ls
REPOSITORY          TAG                 IMAGE ID            CREATED             SIZE
dingchen/latest     latest              181c9e842265        3 minutes ago       1.23MB
dingchen/httpd      v0.1-1              181c9e842265        3 minutes ago       1.23MB
- 删除一个标签
类似于一个硬链接一样,只是删除了标签,并没有删除镜像
[root@centos7_10 ~]# docker image rm dingchen/latest
Untagged: dingchen/latest:latest
[root@centos7_10 ~]# docker image ls
REPOSITORY          TAG                 IMAGE ID            CREATED             SIZE
dingchen/httpd      v0.1-1              181c9e842265        6 minutes ago       1.23MB
- 重新进入新建好的镜像
之前制作的镜像还是一直在存在
[root@centos7_10 ~]# docker run -it dingchen/httpd:v0.1-1
/ # ls /data/html/index.html
/data/html/index.html
/ # cat /data/html/index.html
busybox
**注意:**如果制作了一个正在运行 http 的 busybox,http 服务的状态将不予保存。
范例:制作一个 httpd 的 busyBox 服务器
- 使用
docker -c指定命令,修改inspect命令的查询结果
-c 选项是定义一个 dockerfile 的指令,创建镜像
[root@centos7_10 ~]# docker commit -c 'CMD ["httpd","-f","-h","/data/html"]' 733abdcb3b32 dingchen/httpd:0.2
- 运行刚创建好的镜像
[root@centos7_10 ~]# docker container run -it dingchen/httpd:0.2

[root@centos7_10 ~]# curl 172.17.0.2
busybox
范例:推送镜像至 docker hub
- 验证用户密码
[root@centos7_10 ~]# docker login -u 134054988docker
Password:
WARNING! Your password will be stored unencrypted in /root/.docker/config.json.
Configure a credential helper to remove this warning. See
https://docs.docker.com/engine/reference/commandline/login/#credentials-store

Login Succeeded
- 在 docker hub 创建网络仓库
- 更改本地镜像的镜像文件名与网络仓库名相对应
[root@centos7_10 ~]# docker tag dingchen/httpd:0.2 134054988docker/busybox:0.2
- 推送镜像到远程仓库
[root@centos7_10 ~]# docker push 134054988docker/busybox:0.2
The push refers to repository [docker.io/134054988docker/busybox]
871c552e6e7a: Pushed
d2421964bad1: Pushed
0.2: digest: sha256:ae4f9fe3d34a22d3e70cc91bc9c05178c743e5acc8d4d58a8aa189aae1bad59f size: 734
镜像的导入和导出
可以将主机的镜像进行导出并打包压缩,并将压缩包复制到其他主机上进行导入。
可以快速部署 docker 镜像的环境,完成镜像的迁移。
范例:打包所有镜像删除后恢复
- 打包所有镜像
[root@centos7_10 ~]# docker save -o image.gz `docker image ls|awk -F ' ' '{print $1}'|grep -v RE`
- 删除所有镜像
[root@centos7_10 ~]# docker image rm -f `docker images -q`
- 恢复所有镜像
[root@centos7_10 ~]# docker load -i image.gz
d2421964bad1: Loading layer   1.45MB/1.45MB
871c552e6e7a: Loading layer   5.12kB/5.12kB
Loaded image: 134054988docker/busybox:0.2
Loaded image: dingchen/httpd:0.2
Loaded image: registry.cn-hangzhou.aliyuncs.com/dicjer/busybox:0.2
Loaded image: dingchen/httpd:v0.1-1
ace0eda3e3be: Loading layer  5.843MB/5.843MB
93e19e6dd56b: Loading layer  17.46MB/17.46MB
e2a648dc6400: Loading layer  3.072kB/3.072kB
2c8583333eb3: Loading layer  4.096kB/4.096kB
2367050c34dd: Loading layer  3.584kB/3.584kB
Loaded image: nginx:1-alpine
d0fe97fa8b8c: Loading layer  72.49MB/72.49MB
832f21763c8e: Loading layer  338.4kB/338.4kB
223b15010c47: Loading layer  4.191MB/4.191MB
6a9976a8f408: Loading layer   30.6MB/30.6MB
c875a9fc3ec7: Loading layer  1.536kB/1.536kB
d9364cb75b1a: Loading layer  3.584kB/3.584kB
Loaded image: redis:latest
Loaded image: busybox:latest
- 再次查看镜像
[root@centos7_10 ~]# docker image ls
REPOSITORY                                         TAG                 IMAGE ID            CREATED             SIZE
134054988docker/busybox                            0.2                 3b7c2d73a5ab        2 hours ago         1.23MB
dingchen/httpd                                     0.2                 3b7c2d73a5ab        2 hours ago         1.23MB
registry.cn-hangzhou.aliyuncs.com/dicjer/busybox   0.2                 3b7c2d73a5ab        2 hours ago         1.23MB
dingchen/httpd                                     v0.1-1              181c9e842265        3 hours ago         1.23MB
nginx                                              1-alpine            e5dcd7aa4b5e        5 days ago          21.8MB
redis                                              latest              62f1d3402b78        2 weeks ago         104MB
busybox                                            latest              f0b02e9d092d        3 weeks ago         1.23MB
命令整理
docker commit 制作容器镜像
docker save 保存镜像(导出镜像)
docker load 导入镜像