实验介绍
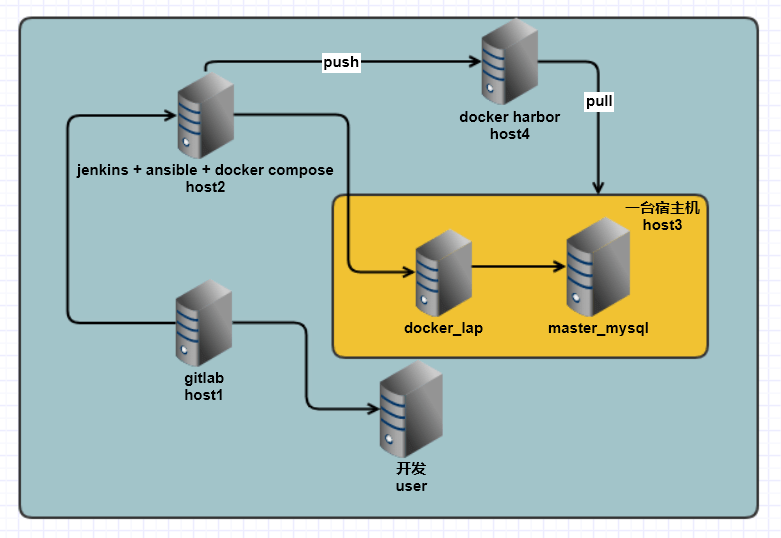
拓扑图如下
实现目标
实现开发人员通过推送代码到 gitlab,然后通过与 jenkins 建立的函数钩子,触发构建 docker compose 并提交到 docker harbor 镜像仓库中。最后触发 ansible-playbook 控制宿主机从 docker harbor 中拉取镜像并部署代码上线。
此环境应该应用于测试环境中。
主机规划
| 主机名 | 作用 | 拓扑图对应名称 | IP |
|---|---|---|---|
| centos7_10 | 宿主机 | host3 | 192.168.1.10 |
| centos7_11 | compose ansible jenkins | host2 | 192.168.1.11 |
| centos7_12 | gitlab | host1 | 192.168.1.12 |
| centos7_13 | docker-harbor | host4 | 192.168.1.13 |
| centos7_14 | 开发人员 | user | 192.168.1.14 |
实验步骤
- 编写 dockerfile 并测试对应效果
- 配置 gitlab
- 配置 jenkins
- 配置 docker-harbor
- 实现结合
准备 DOCKER-COMPOSE 文件
- 创建目录结构
[root@centos7_10 compose]# tree
.
├── docker-compose.yml
└── web
- 编写 lap 架构
编写 dockerfile
[root@centos7_10 compose]# cat web/Dockerfile
FROM 192.168.1.13/web/centos7:v1

LABEL maintainer="dingchen <dingchen@123.com>"

ADD init.sh /mnt/

RUN curl -o /etc/yum.repos.d/CentOS-Base.repo https://mirrors.aliyun.com/repo/Centos-7.repo \
    && curl -o /etc/yum.repos.d/epel.repo http://mirrors.aliyun.com/repo/epel-7.repo \
    && yum makecache \
    && yum install httpd php php-mysql -y \
    && sed -Ei "s@(    DirectoryIndex) (index.html)@\1 index.php \2@g" /etc/httpd/conf/httpd.conf \
    && chmod 755 /mnt/init.sh \
    && yum clean all \
    && rm -rf /etc/yum.repos.d/*

WORKDIR /mnt/

CMD ["/usr/sbin/httpd","-D","FOREGROUND"]

ENTRYPOINT ["./init.sh"]
init.sh 脚本内容
[root@centos7_10 compose]# cat web/init.sh
#!/bin/sh

cat > /var/www/html/index.php <<EOF
<?php
\$conn = mysql_connect('mysql','root','123.com');
if (\$conn)
echo "OK";
else
echo "Failure";
mysql_close();
?>
EOF

exec $@
- docker-compose 编排剧本编写
[root@centos7_10 compose]# cat docker-compose.yml
version: '3'
services:
  web:
    build:
     context: ./web/
     dockerfile: Dockerfile
    depends_on:
      - db
    container_name: lap
    ports:
      - "80:80"
    links:
      - "db:mysql"
    volumes:
      - /data/www:/var/www/html/
  db:
    image: "192.168.1.13/web/mysql:5.7"
    environment:
      MYSQL_ROOT_PASSWORD: 123.com
    container_name: db
- 执行测试
执行 docker-compose
[root@centos7_10 compose]# docker-compose up
访问本地的 web 服务,查看 php 脚本是否返回成功
[root@centos7_10 compose]# curl 127.0.0.1
OK[root@centos7_10 compose]#
配置 gitlab
应用主机
host1 操作 192.168.1.12
实际操作
邮箱服务配置
- 安装 postfix
yum install postfix
systemctl enable postfix
systemctl start postfix
gitlab 配置
- 下载安装包
[root@centos7_12 ~]# wget https://mirrors.tuna.tsinghua.edu.cn/gitlab-ce/yum/el7/gitlab-ce-10.0.0-ce.0.el7.x86_64.rpm
- 安装gitlab
[root@centos7_12 ~]# yum install gitlab-ce-10.0.0-ce.0.el7.x86_64.rpm -y
- 初始化配置 gitlab
[root@centos7_12 ~]# gitlab-ctl reconfigure
···
···
Running handlers:
Running handlers complete
Chef Client finished, 360/515 resources updated in 01 minutes 45 seconds
gitlab Reconfigured!
- 配置 gitlab 的网站地址
[root@centos7_12 ~]# vim /etc/gitlab/gitlab.rb
external_url 'http://192.168.1.12'            #修改此行,此行标识的含义为监听的主页地址
- 配置邮箱
[root@centos7_12 ~]# vi /etc/gitlab/gitlab.rb
# 配置邮箱
gitlab_rails['smtp_enable'] = true
gitlab_rails['smtp_address'] = "smtp.163.com"
gitlab_rails['smtp_port'] = 465
gitlab_rails['smtp_user_name'] = "邮箱地址"
gitlab_rails['smtp_password'] = "授权码"
gitlab_rails['smtp_domain'] = "163.com"
gitlab_rails['smtp_authentication'] = "login"    指定验证动作
gitlab_rails['smtp_enable_starttls_auto'] = true
gitlab_rails['smtp_tls'] = true
gitlab_rails['gitlab_email_from'] = "邮箱地址"
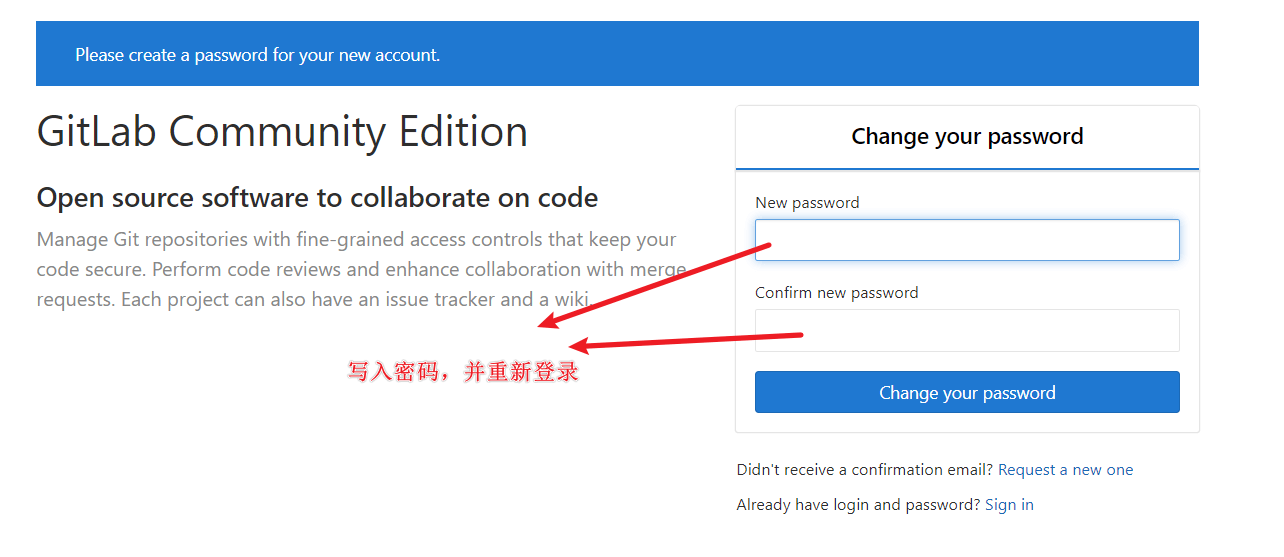
- 进入 gitlab 网站,并初始化密码
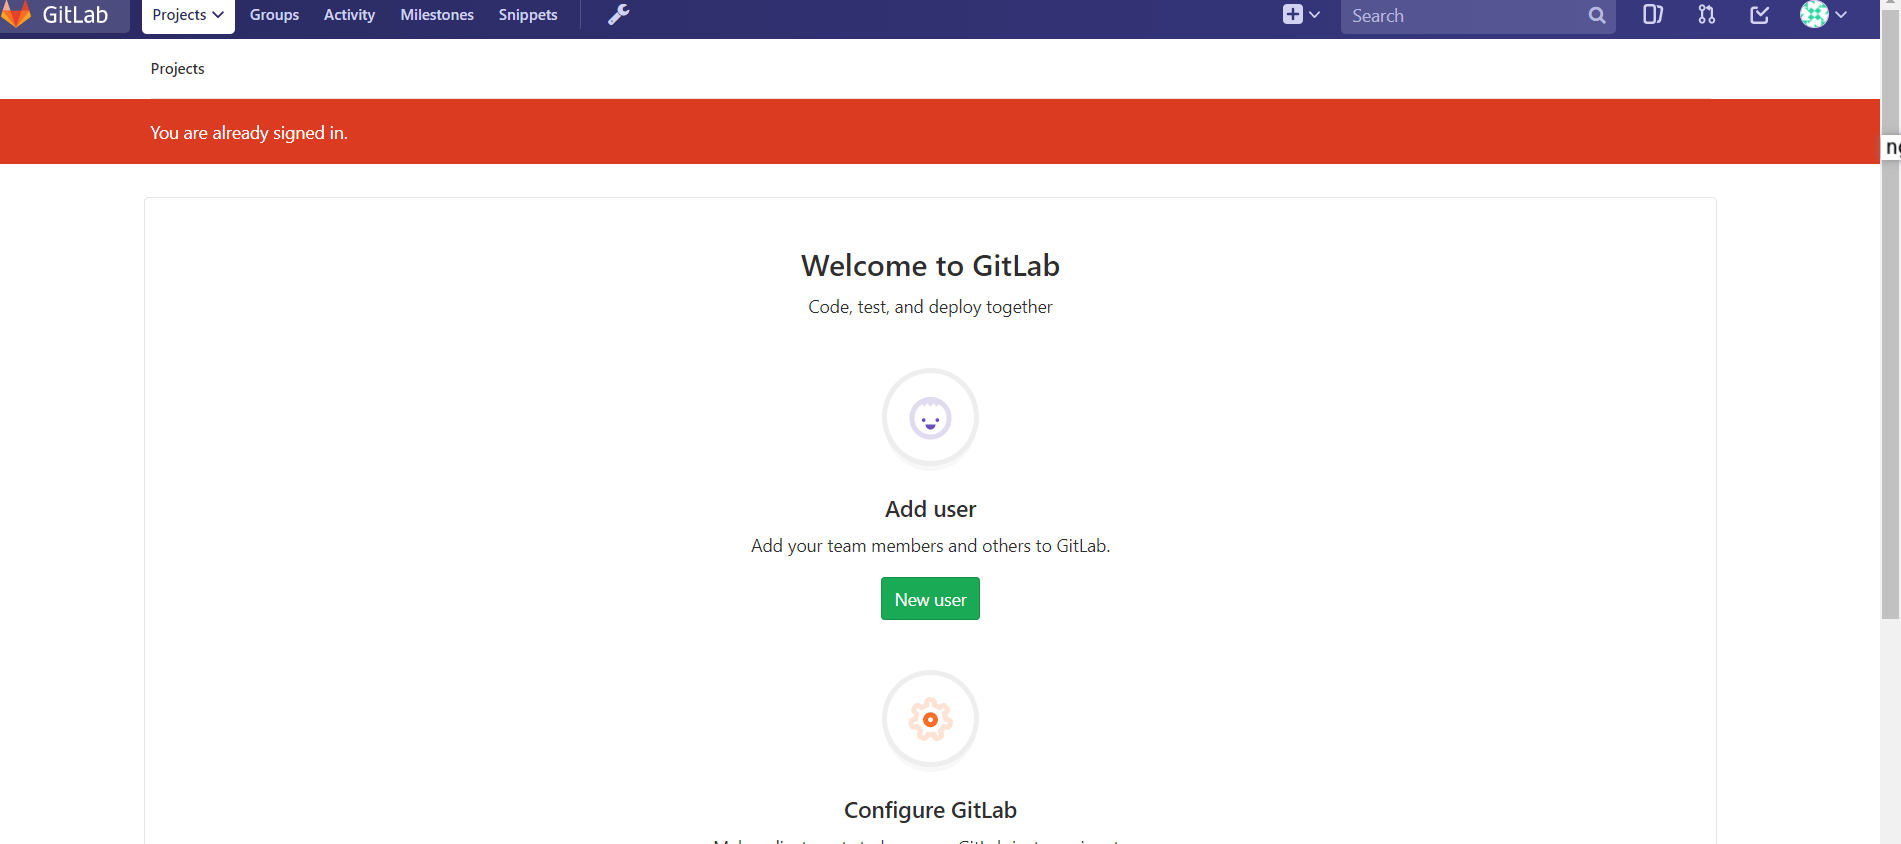
- 成功进入
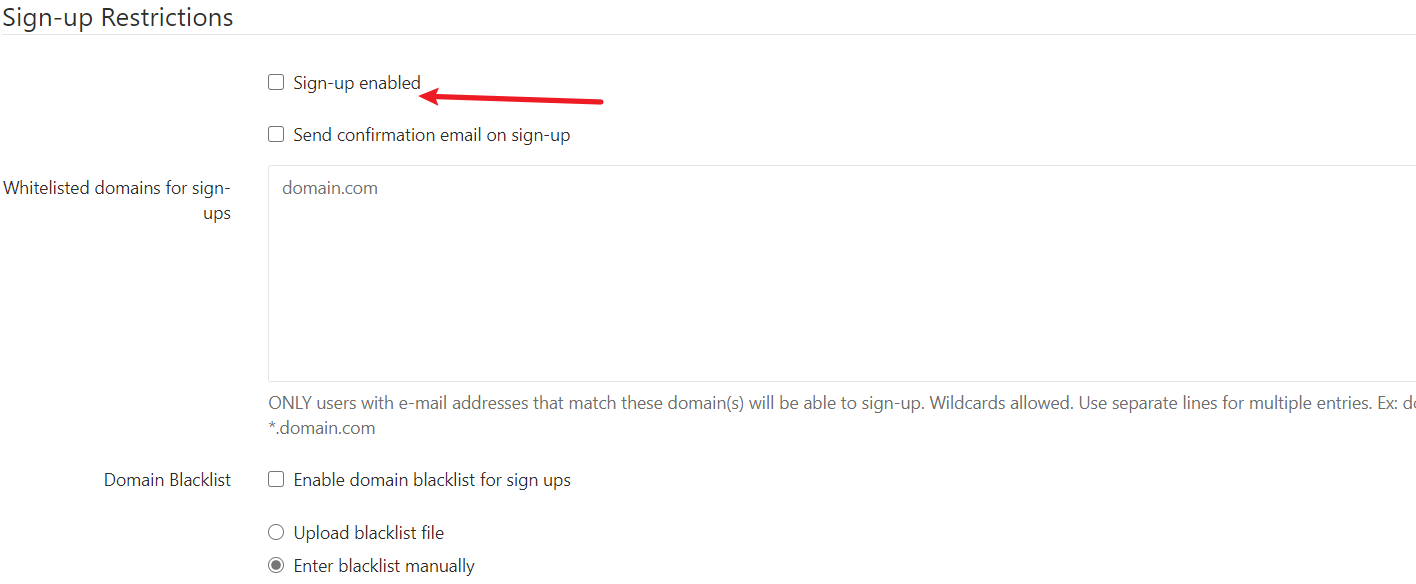
关闭用户注册
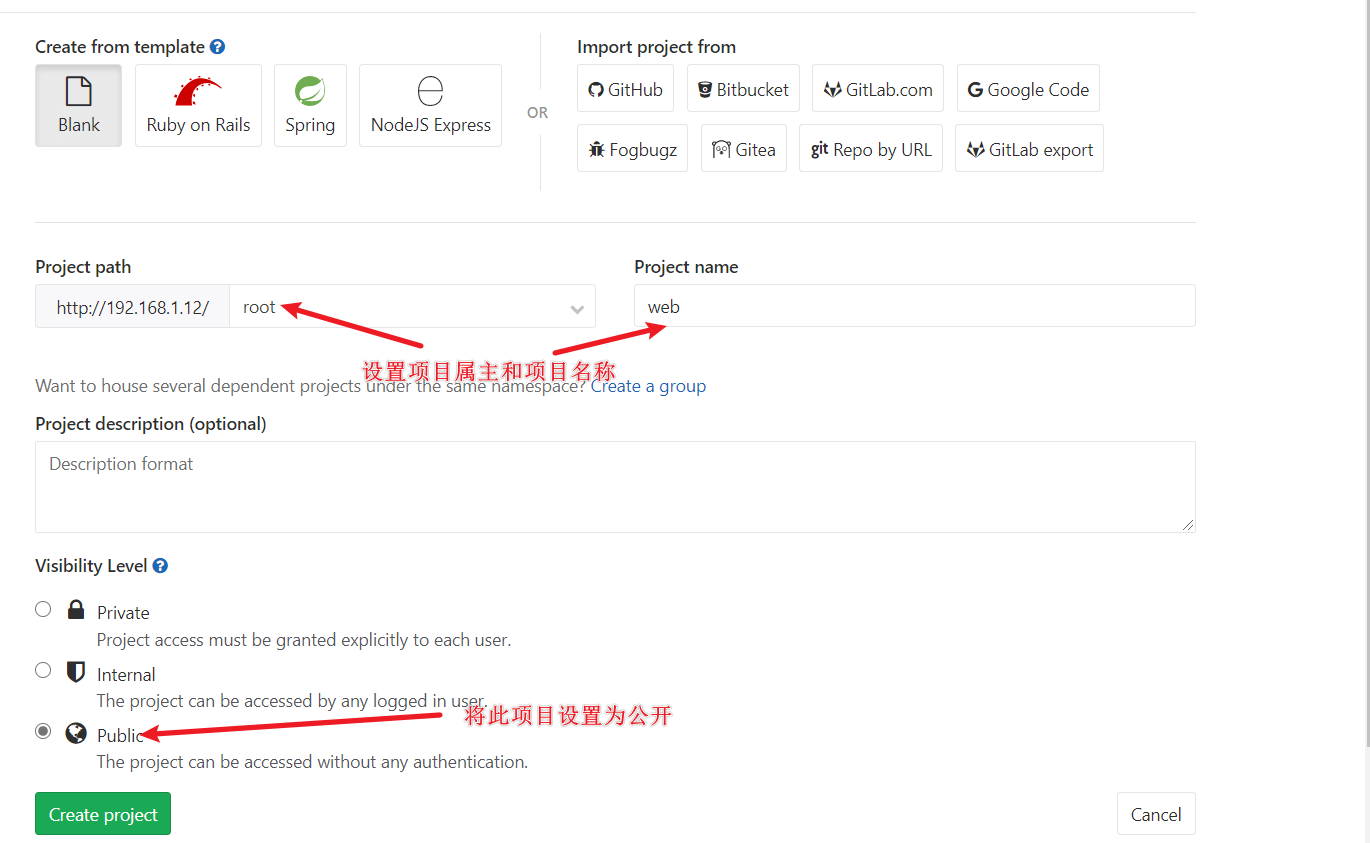
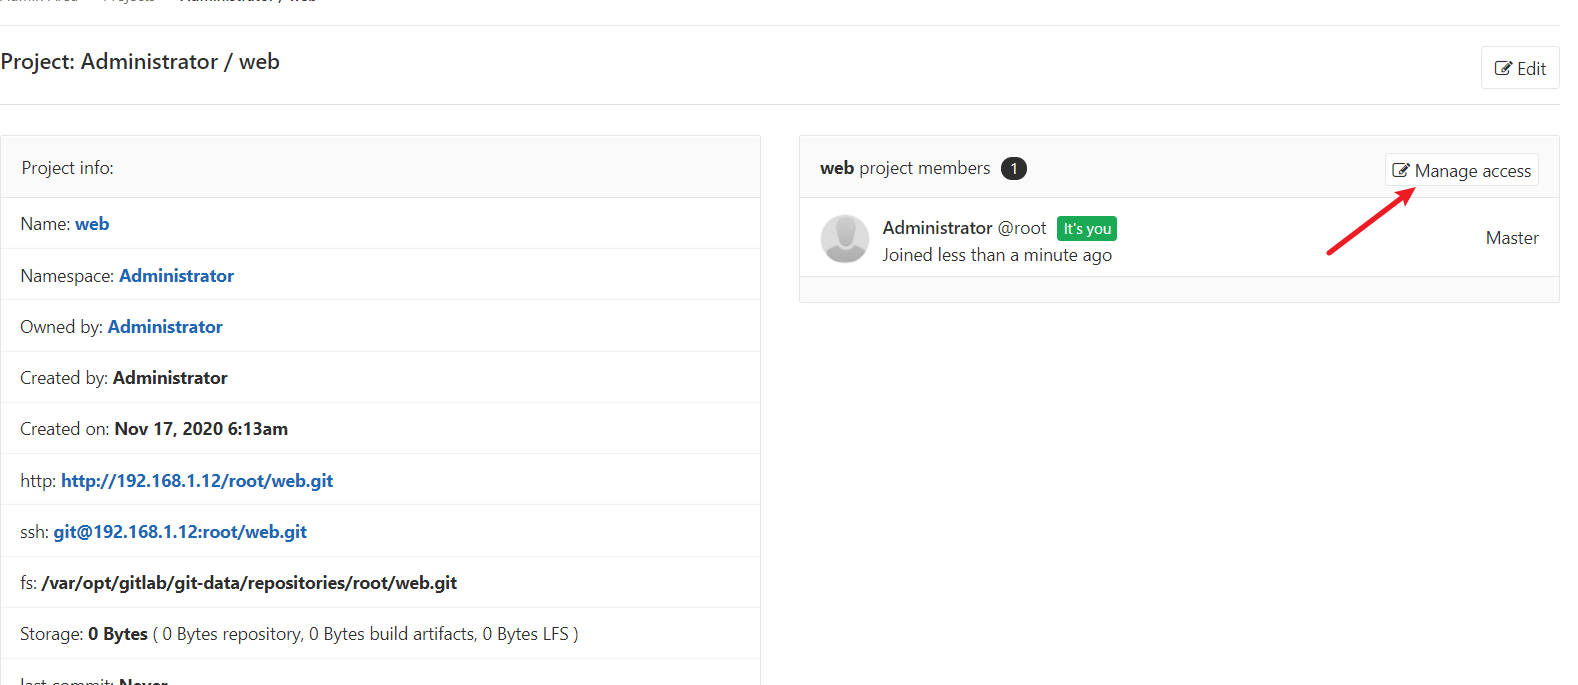
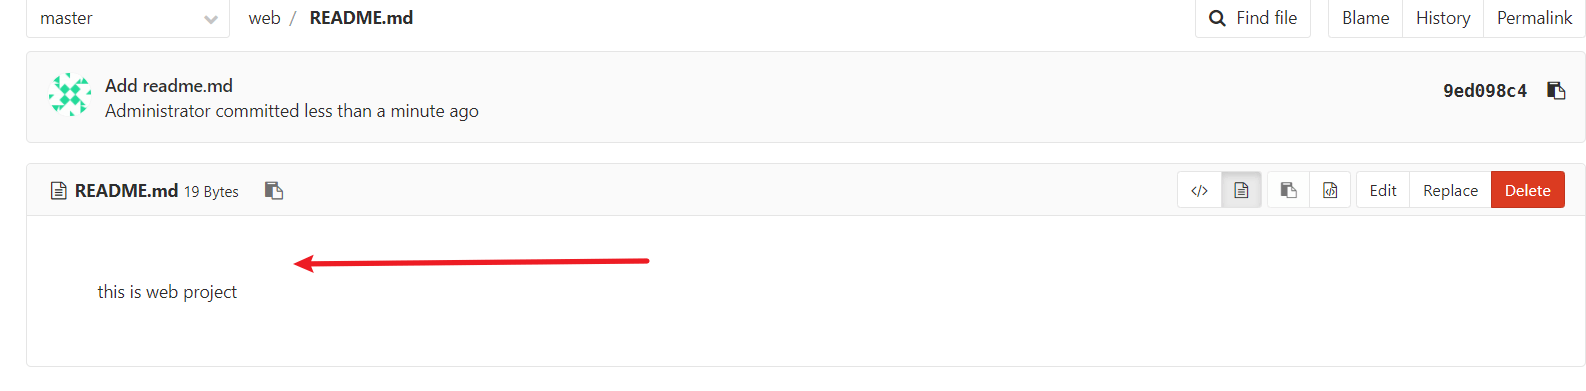
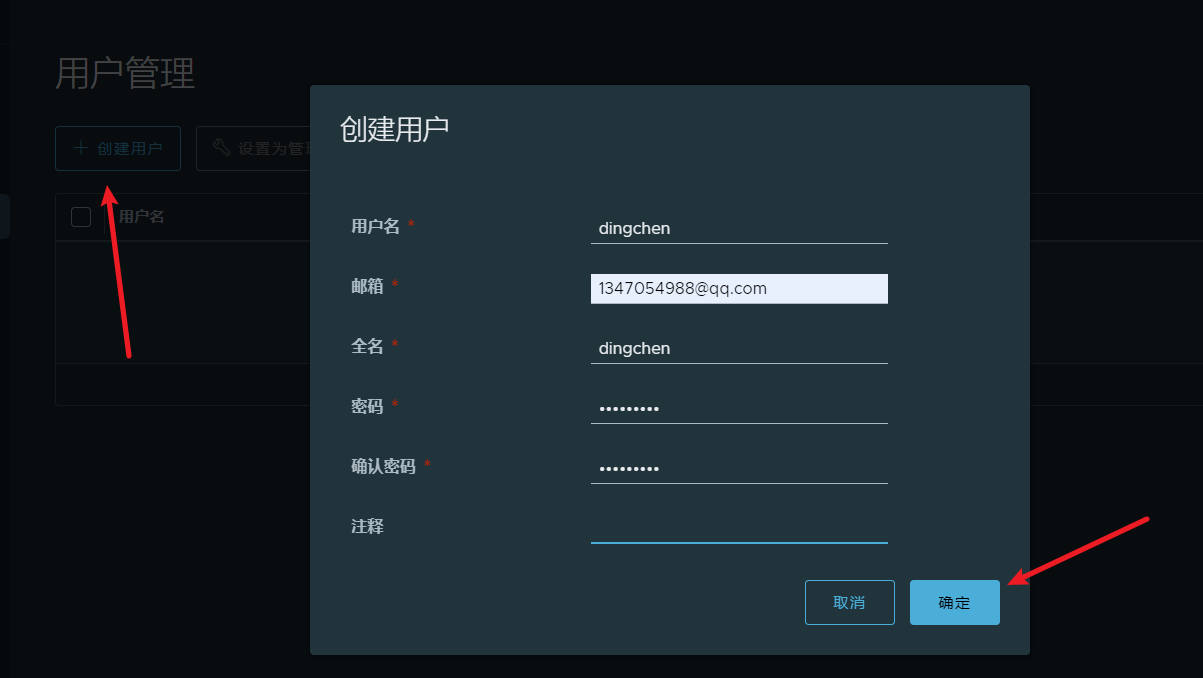
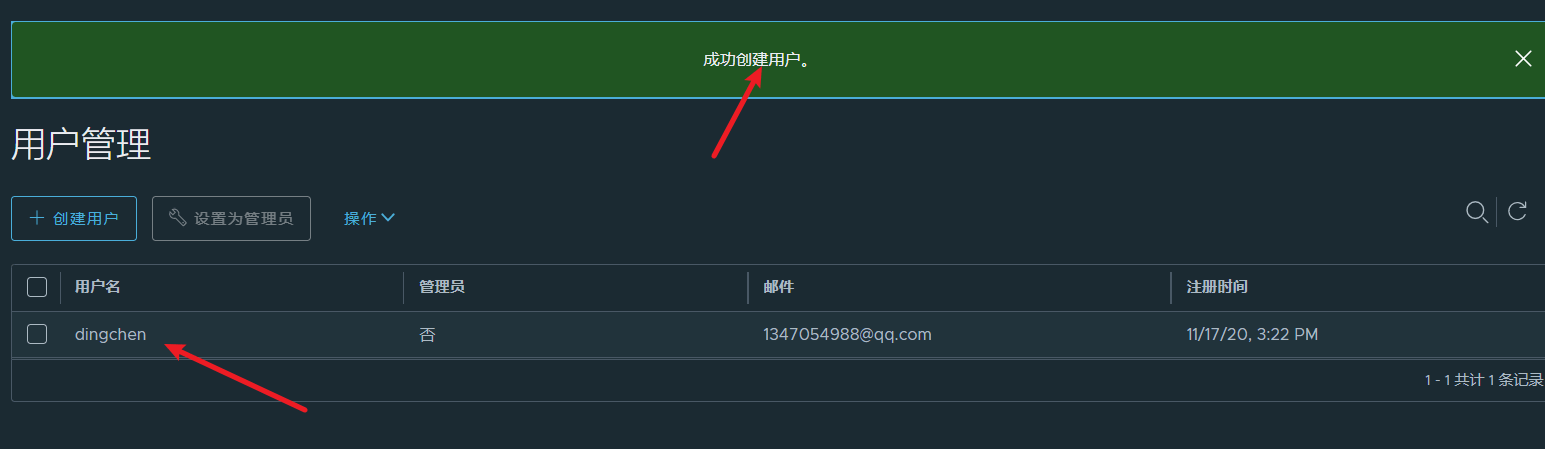
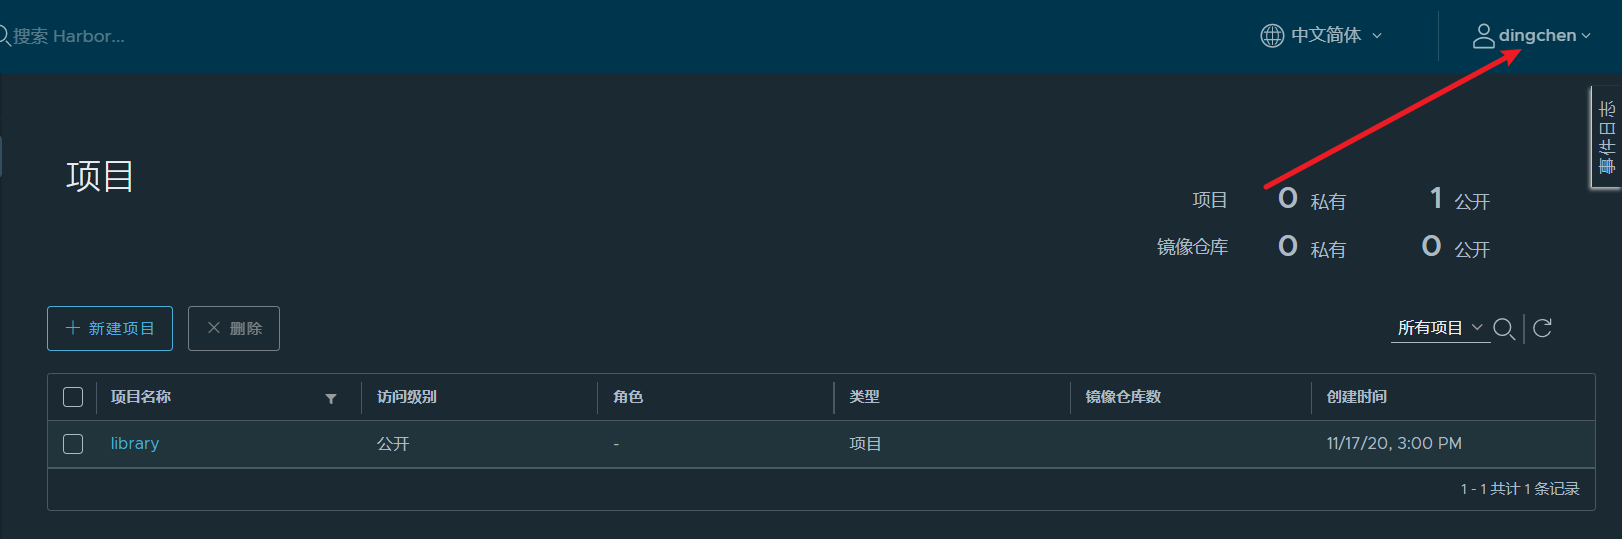
- 创建一个新的项目
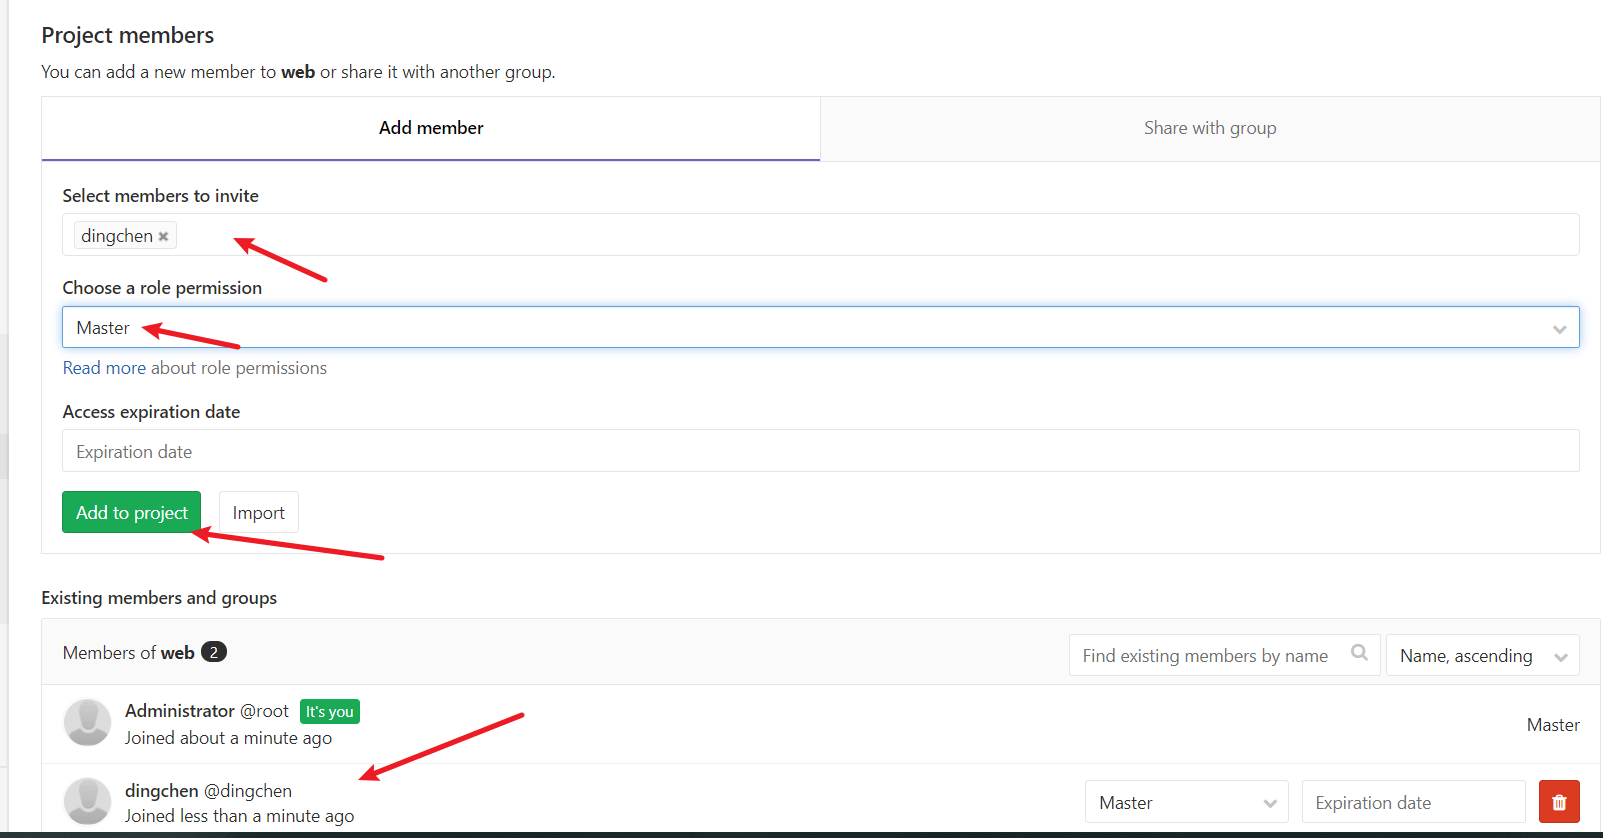
- 将新创建的 dingchen 用户加入到项目中
配置 jenkins
应用主机
host2 IP 地址为 192.168.1.11
实际操作
安装 java 环境
[root@centos7_11 ~]# yum install java-1.8.0-openjdk -y
部署 jenkins
- 下载 jenkins
https://www.jenkins.io/download/ 官方网站
- 通过 java 启动下载的 war 包
[root@centos7_11 ~]# java -jar jenkins.war
- 查看端口 8080 是否开启
[root@centos7_11 ~]# ss -ntl
State      Recv-Q Send-Q Local Address:Port               Peer Address:Port
LISTEN     0      100     127.0.0.1:25                          *:*
LISTEN     0      128             *:22                          *:*
LISTEN     0      100         [::1]:25                       [::]:*
LISTEN     0      50           [::]:8080                     [::]:*
LISTEN     0      128          [::]:22                       [::]:*
- 通过 web 访问网站
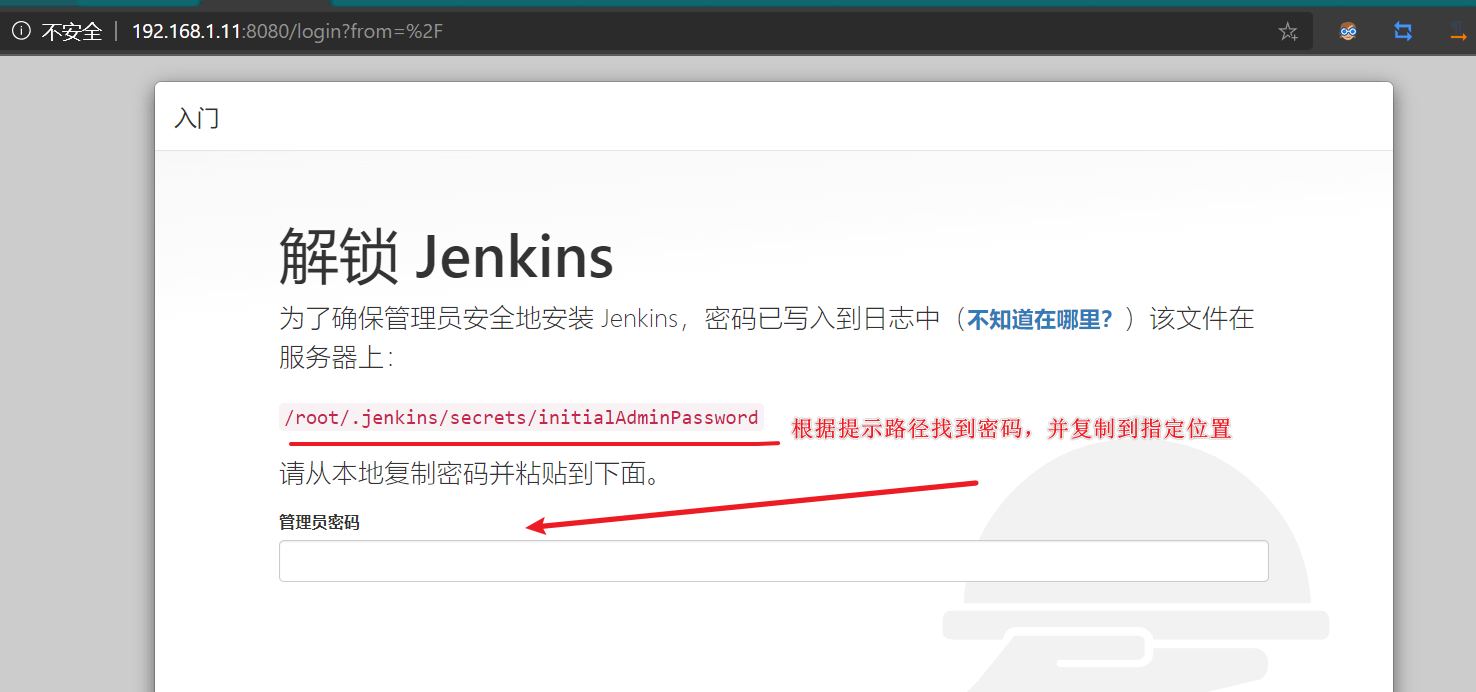
[root@centos7_11 ~]# cat /root/.jenkins/secrets/initialAdminPassword
fc84750dff184758b335a733c2a44329
- 替换安装插件源,否则有可能会失败
[root@centos7_11 ~]# sed -i 's#http://updates.jenkins-ci.org/download#https://mirrors.tuna.tsinghua.edu.cn/jenkins#g' updates/default.json && sed -i 's#http://www.google.com#https://www.baidu.com#g' updates/default.json
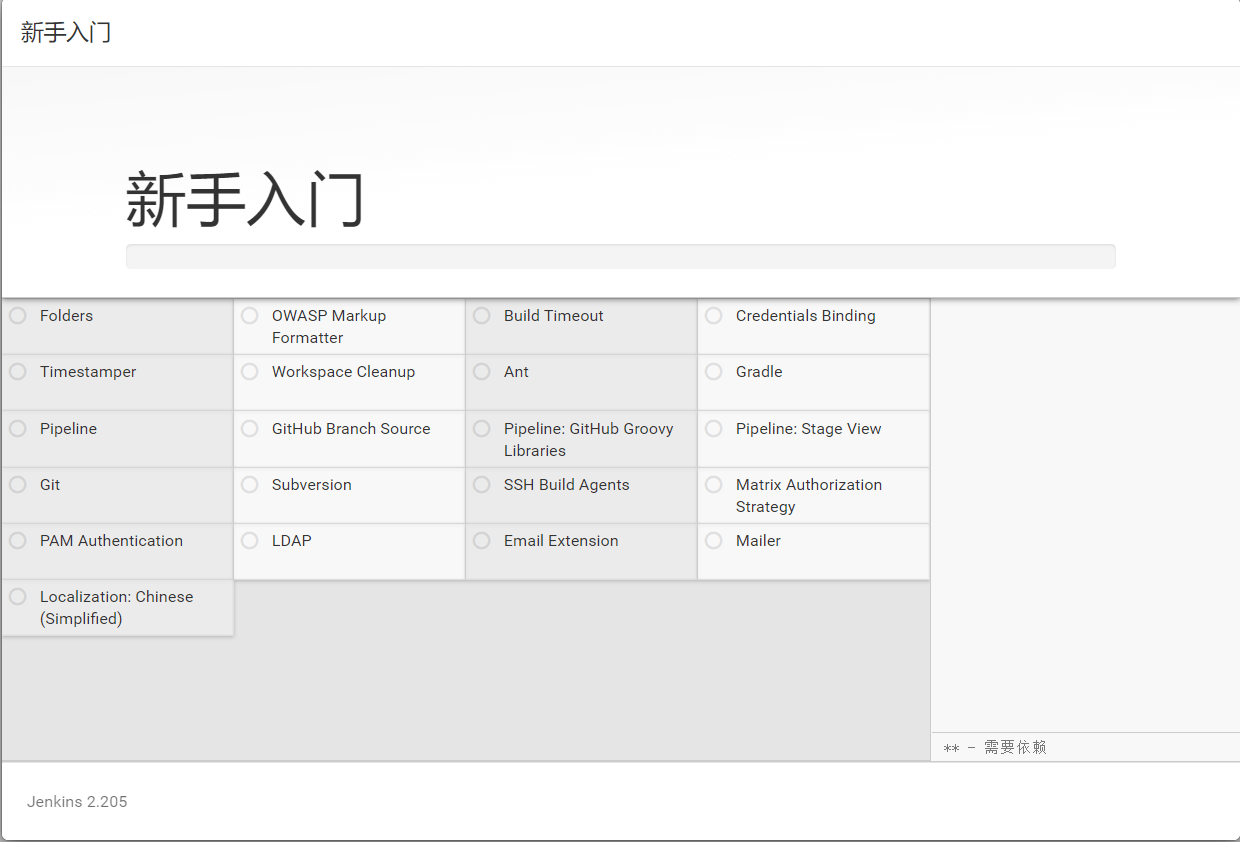
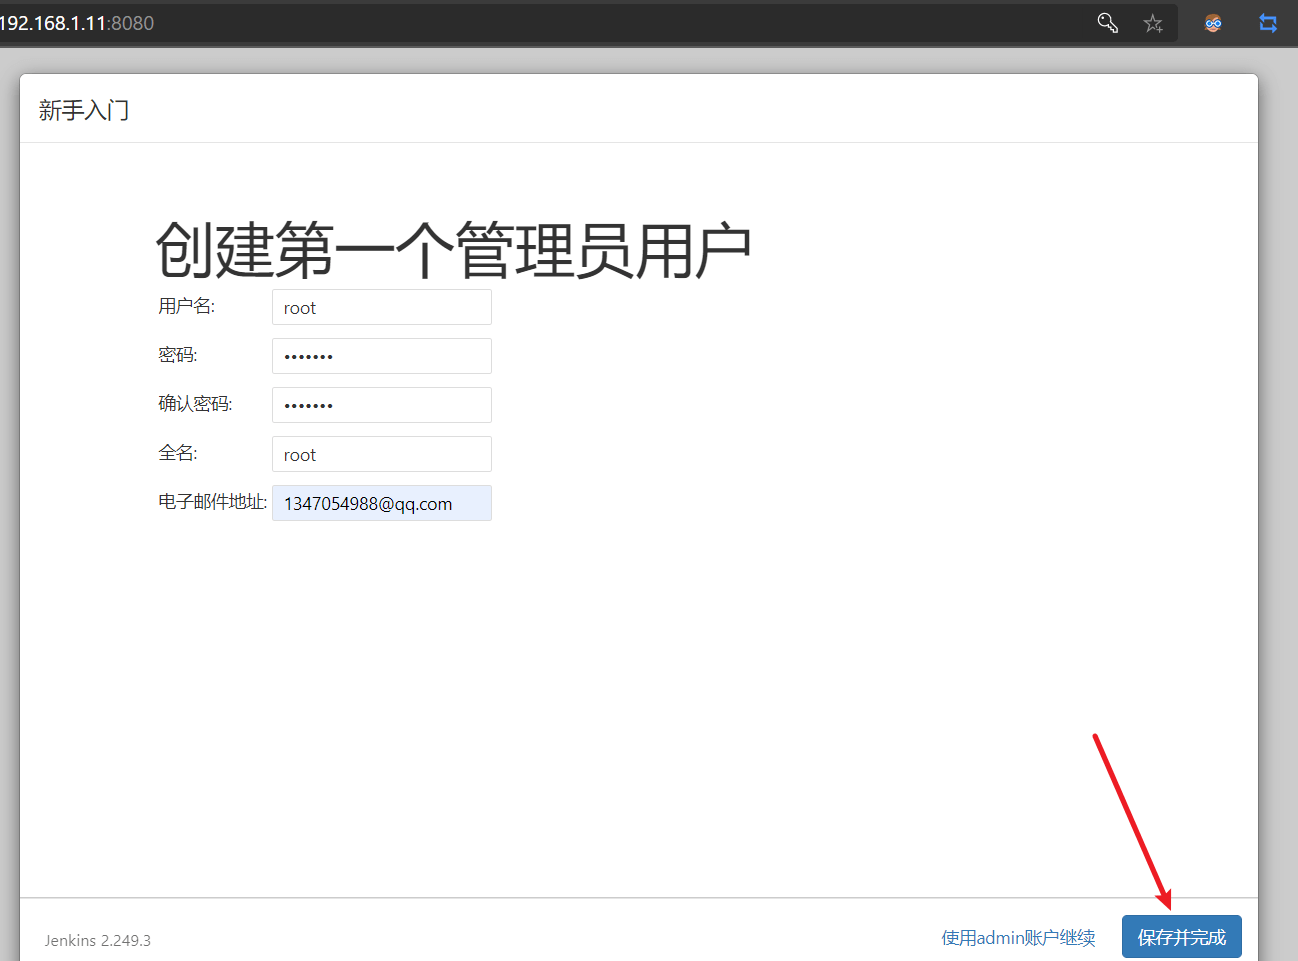
- 安装插件,创建用户
- 进入主页面
- 安装必要插件
Role-based Authorization Strategy
Gitlab Authentication
GitLab Logo
Blue Ocean
Gitlab
Gitlab Authentication plugin
Gitlab Hook Plugi
Gitlab Hook
配置 jenkins 触发器
- 设置安全配置


- 配置凭证
查看私钥
[root@centos7_11 ~]# cat .ssh/id_rsa
配置 jenkins 中的凭证

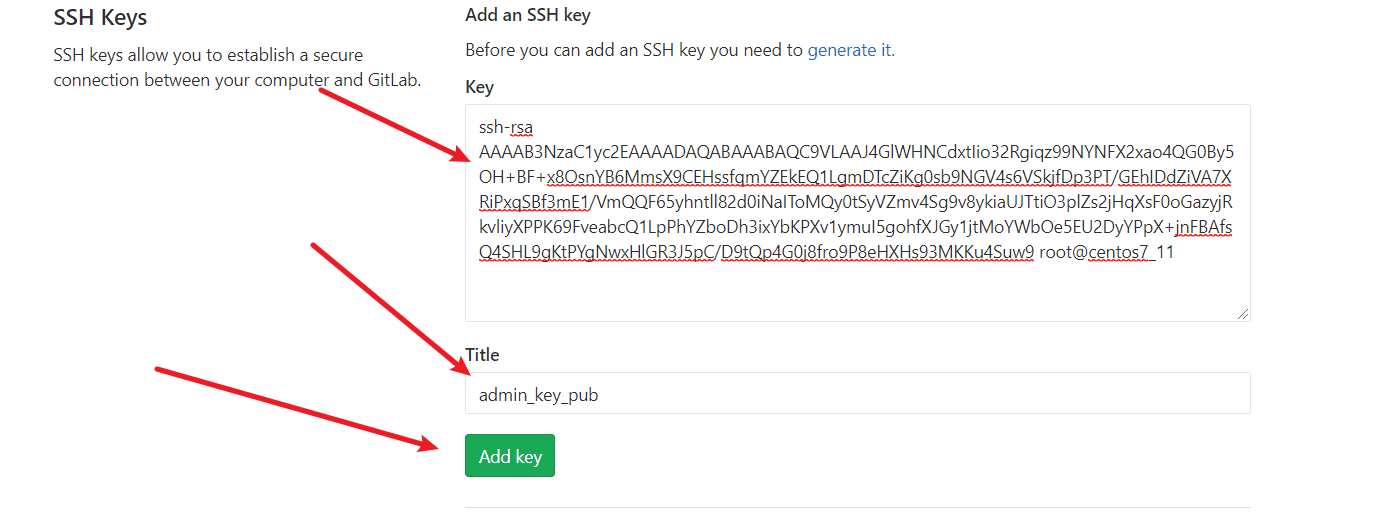
- 配置 gitlab 的 key 验证
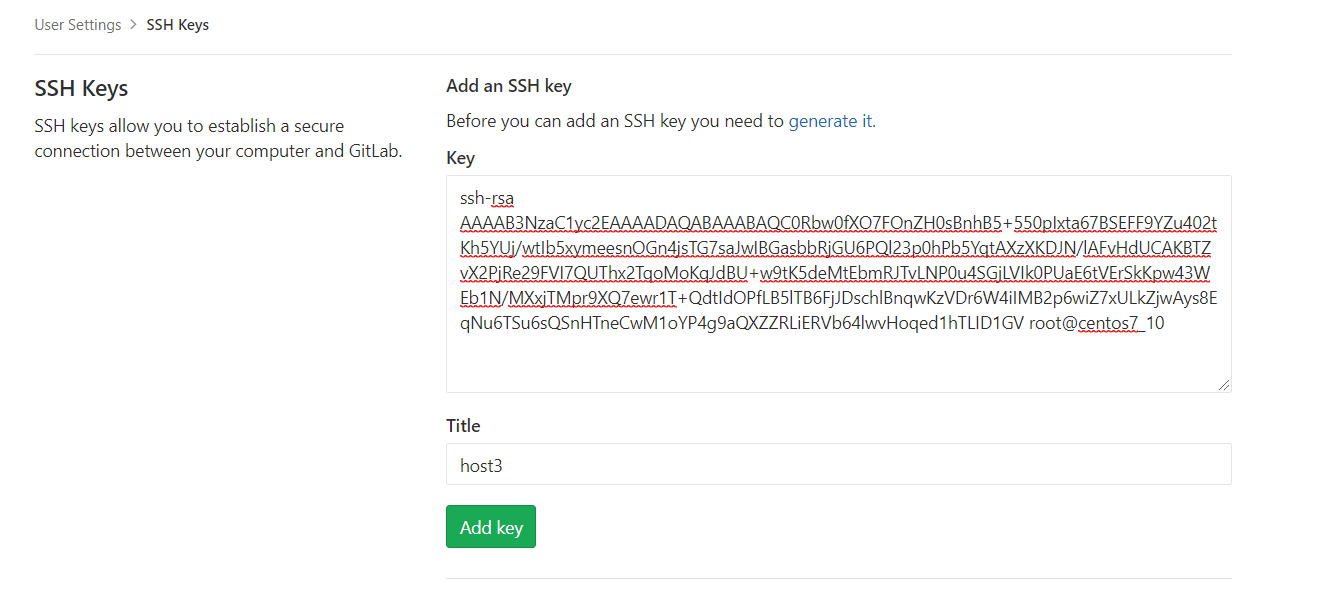
查看公钥
[root@centos7_11 ~]# cat .ssh/id_rsa.pub
配置 gitlab 的 key 验证
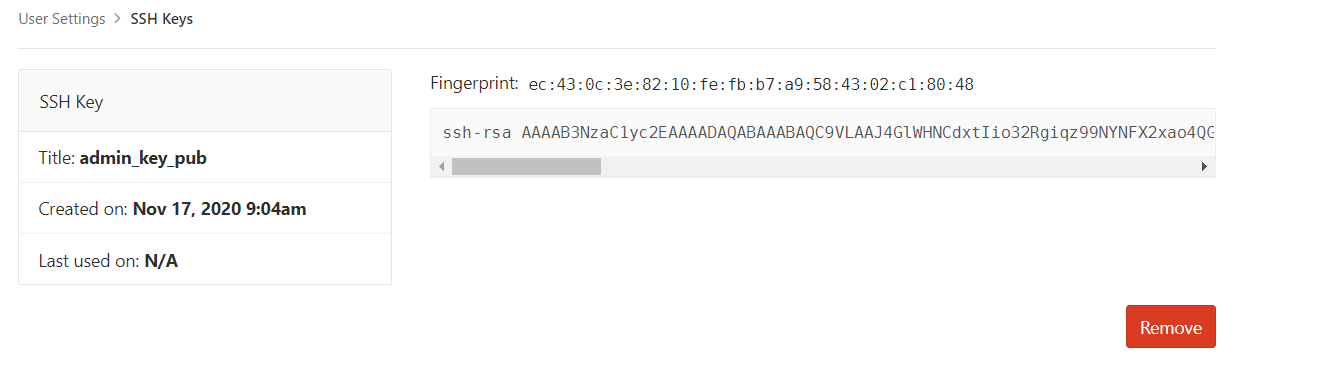
查看是否添加成功
- jenkins 拉取项目,测试是否成功
yum install git -y
测试是否拉取成功
[root@centos7_11 ~]# git clone git@192.168.1.12:root/web.git
Cloning into 'web'...
warning: You appear to have cloned an empty repository.
- jenkins 创建新项目

生成随机数
[root@centos7_11 ~]# openssl rand -hex 10
cb8908c533c9c8f65d40
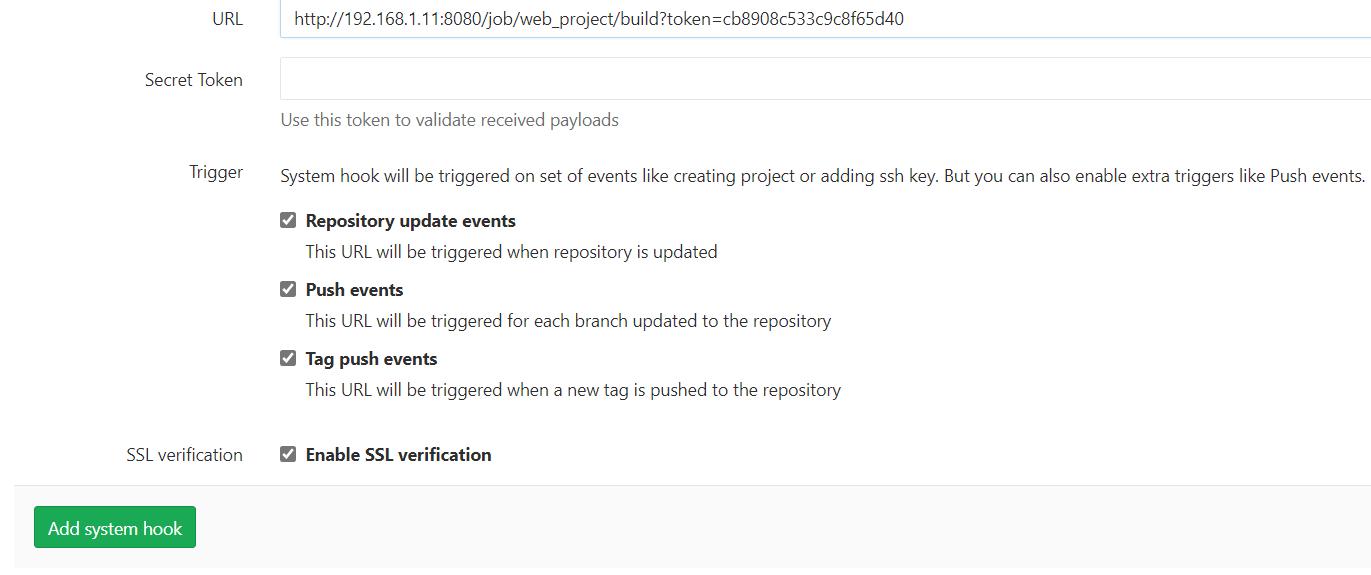
定义触发器的 Token 值
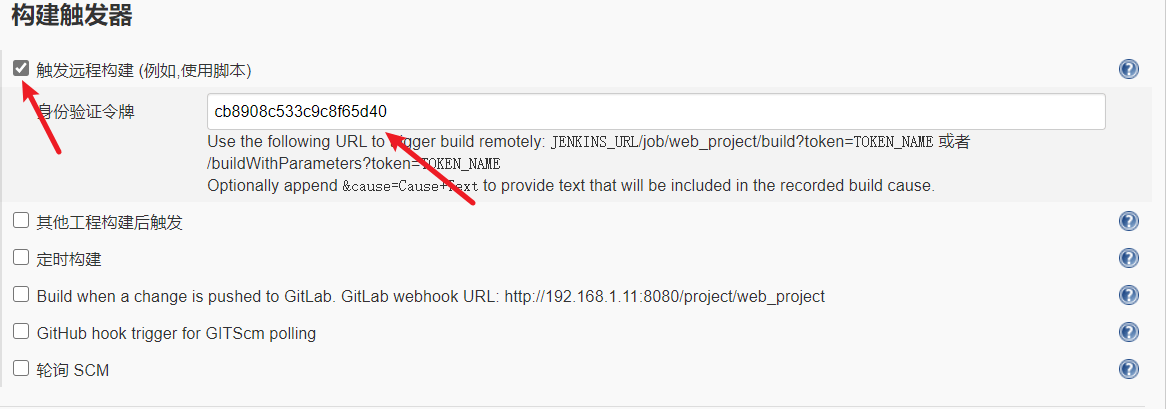
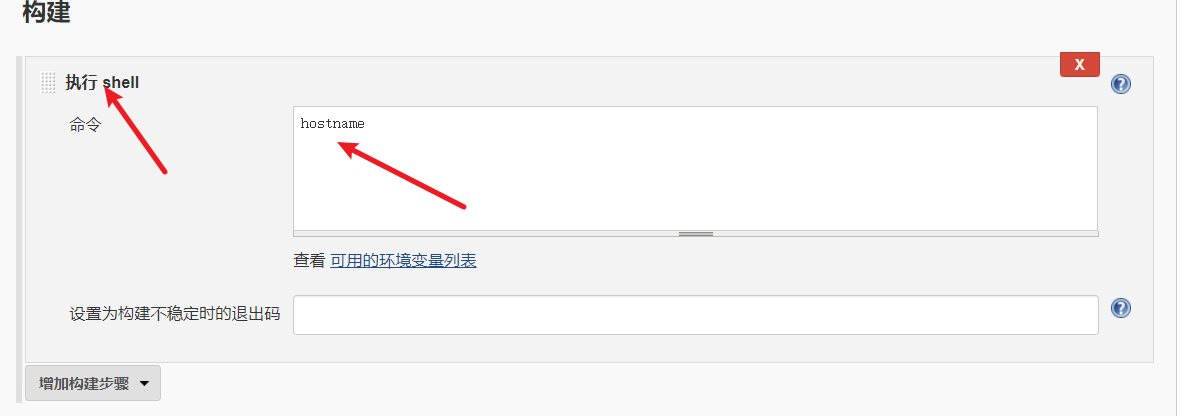
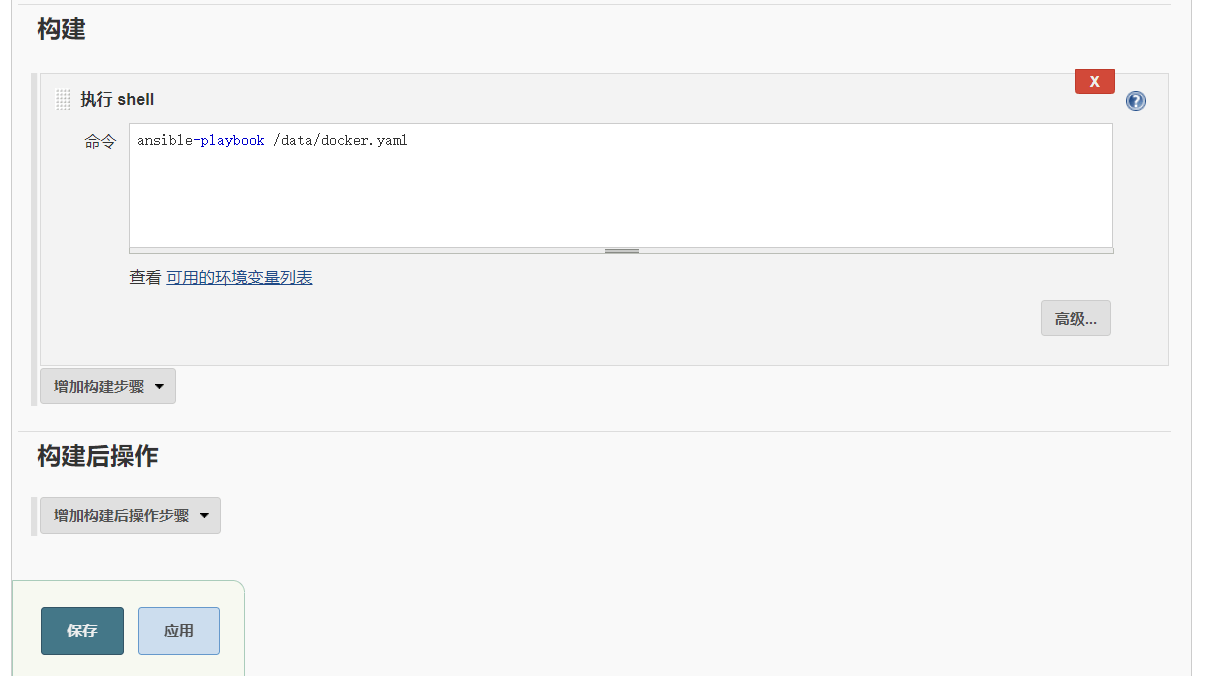
- 定义构建后执行的命令
- 访问测试网页
http://192.168.1.11:8080/job/web_project/build?token=cb8908c533c9c8f65d40
访问测试

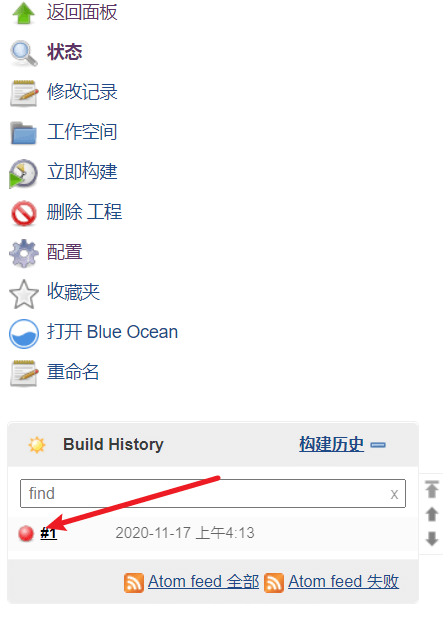
测试的同时发现 jenkins 工程状态栏会多出任务并且在执行,但是因为没有配置 gitlab 的钩子所以出现错误。
- 配置 gitlab 钩子
- 为 gitlab 创建一个 RENAMED 文件,否则 Jenkins 会报错。
配置 HARBOR
应用主机
host2 IP 地址为 192.168.1.11
实际操作
- 下载 harbor
通过官方网站进行下载
https://goharbor.io/
- 安装 harbor
[root@centos7_13 ~]# tar -xf harbor-offline-installer-v2.1.1.tgz -C /usr/local/
[root@centos7_13 harbor]# yum install docker-ce docker-compose -y
[root@centos7_13 harbor]# systemctl start docker
[root@centos7_13 harbor]# mv harbor.yml.tmpl harbor.yml
打开 harbor.yml 文件,修改 hostname 一项为自己的 IP 或者是域名。
注释 https 相关选项。
[root@centos7_13 harbor]# ./install.sh
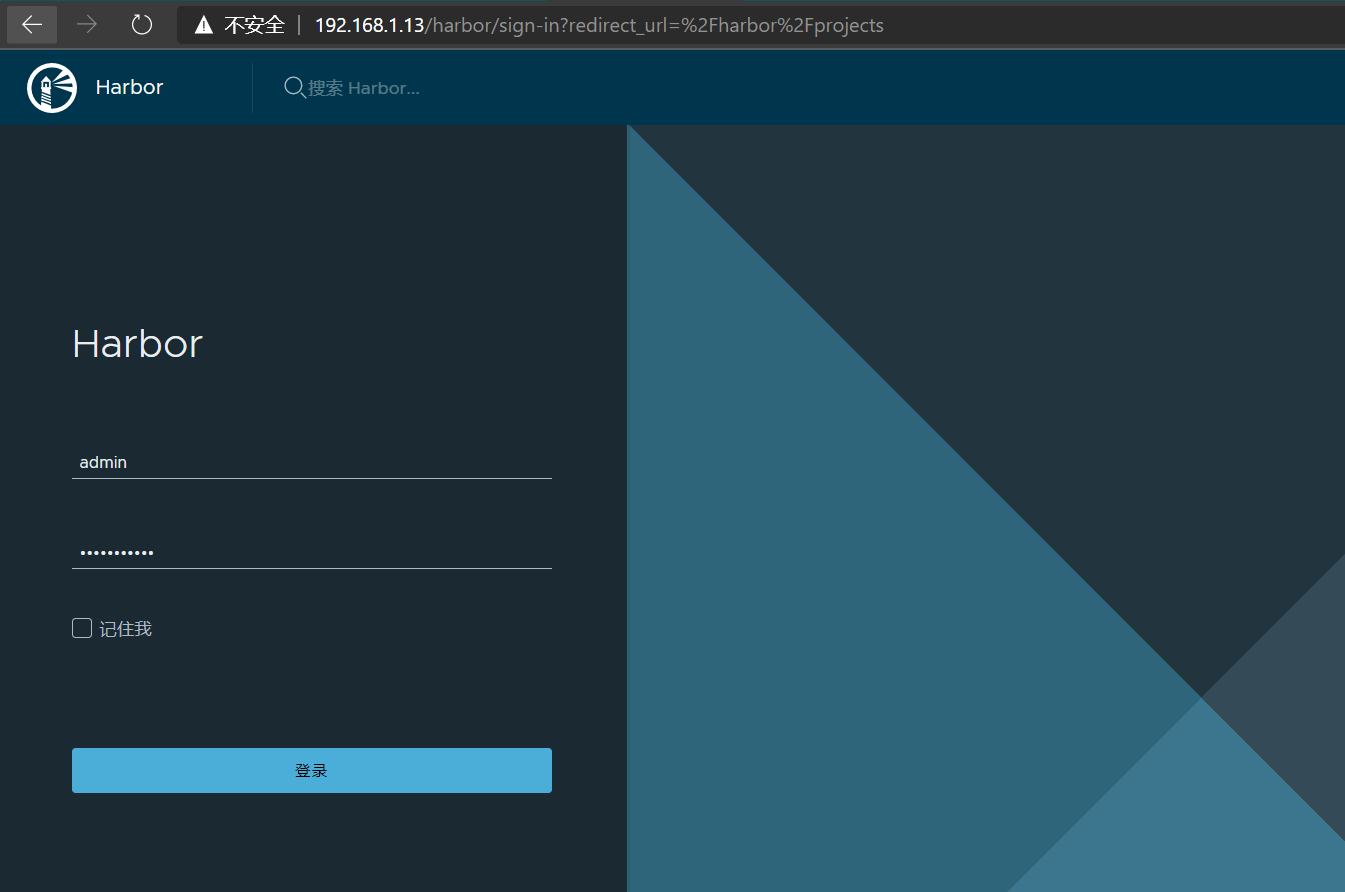
- 启动 harbor 并登录
用户名为默认管理员 admin,密码为 harbor.yml 文件中定义的密码
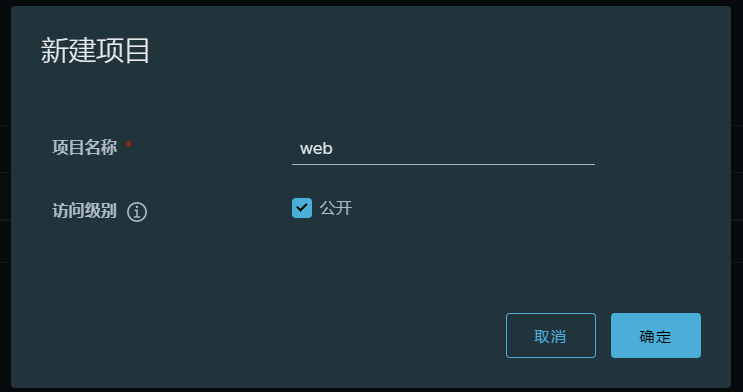
- 进入 harbor 创建新用户,并创建新的项目
- 退出当前用户使用新用户登录
- 新建项目名为 web 的项目
推送必要的镜像
应用主机
host3 IP 地址为 192.168.1.10
实际操作
- 身份验证
[root@centos7_10 compose]# docker login http://192.168.1.13
Username: dingchen
Password:
WARNING! Your password will be stored unencrypted in /root/.docker/config.json.
Configure a credential helper to remove this warning. See
https://docs.docker.com/engine/reference/commandline/login/#credentials-store

Login Succeeded
- 更改推送必要镜像的镜像 tag 并推送
推送基础镜像
[root@centos7_10 compose]# docker tag centos:centos7.7.1908 192.168.1.13/web/centos7:v1
[root@centos7_10 compose]# docker push 192.168.1.13/web/centos7:v1
The push refers to repository [192.168.1.13/web/centos7]
034f282942cd: Pushed
v1: digest: sha256:8f2c78ca3141051eef77fb083066222abf20330a2345c970a5a61427aeb2dc7b size: 529
推送数据库 mysql 镜像
[root@centos7_10 compose]# docker tag mysql:5.7 192.168.1.13/web/mysql:5.7
[root@centos7_10 compose]# docker push 192.168.1.13/web/mysql:5.7
The push refers to repository [192.168.1.13/web/mysql]
c56a0cd7af53: Pushed
6d8730c53a7a: Pushed
ca60295fe694: Pushing [========>                                          ]  54.98MB/313.2MB
38658300afbb: Pushed
15b463db445c: Pushed
c21e35e55228: Pushing [>                                                  ]  553.5kB/52.24MB
36b89ee4c647: Pushing  1.536kB
9dae2565e824: Pushing [==========>                                        ]  899.1kB/4.17MB
ec8c80284c72: Pushing [=>                                                 ]  208.4kB/9.343MB
329fe06a30f0: Waiting
d0fe97fa8b8c: Waiting
- 更改 docker-compose 文件内及 dockerfile 文件内容
更改 docker-compose 文件内容中的 mysql image 字段定义的镜像为
image: "192.168.1.13/web/mysql:5.7"
更改 Dockerfile 文件中定义的 FROM 字段
FROM 192.168.1.13/web/centos7:v1
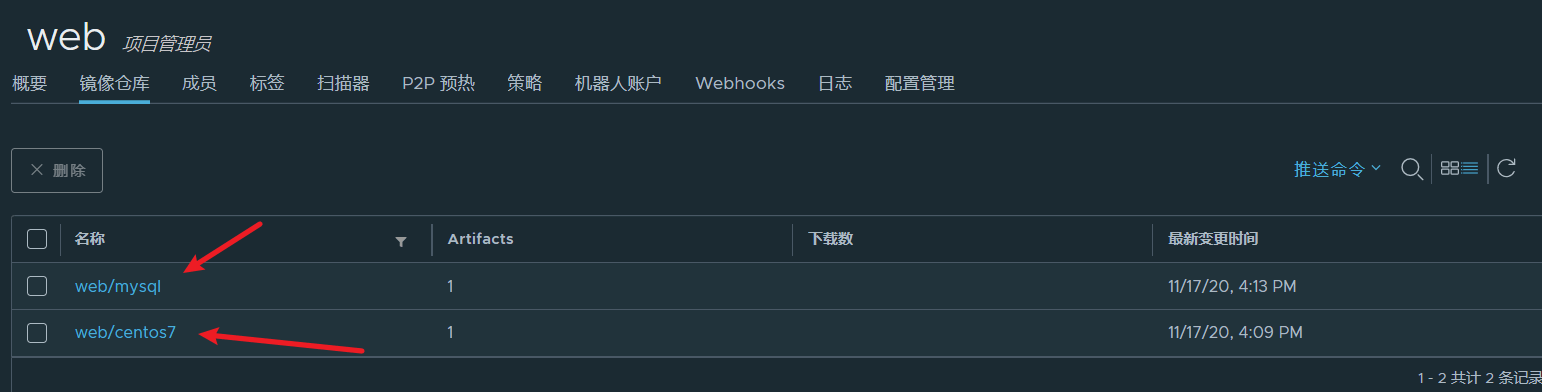
harbor 查看镜像
配置 ansible
应用主机
host2 IP 地址为 192.168.1.11
实际操作
- 进行密钥验证
[root@centos7_11 ~]# ssh-copy-id 192.168.1.10
- 安装 ansible
[root@centos7_11 ~]# yum install ansible -y
- 编写剧本,实现拉取 harbor 中的镜像以及执行 Docker-Compose
定义主机清单
[root@centos7_11 data]# vim /etc/ansible/hosts
[client]
192.168.1.12
- 压缩部署 lamp 架构文件并传输到 host2
[root@centos7_10 data]# tar -cvf docker.tar compose
[root@centos7_10 data]# scp docker.tar root@192.168.1.11:/root/
- gitlab key 验证 host3
[root@centos7_10 data]# ssh-keygen
[root@centos7_10 ~]# cat .ssh/id_rsa.pub
编写剧本
[root@centos7_11 data]# cat docker.yaml
---
- hosts: client
  gather_facts: no
  remote_user: root
  vars:
    - IPADDR: 192.168.1.13
  tasks:
    - name: install
      yum: name=rsync,git state=installed

    - name: mkdir
      file: path={{ item.path }} state=directory
      with_items:
        - path: /data/www/
        - path: /docker/

    - name: mkdir directory
      file: path=/docker/web/ state=directory
      notify: clone_git

    - name: copy compose
      unarchive: src=/data/docker.tar dest=/docker/

    - name: git fetch
      wait_for: path=/docker/web
      notify: fetch_git
    - name: sync code
      shell: rsync --delete -avz /docker/web/ /data/www/
    - name: exec compose
      shell:
        cmd: nohup docker-compose up &> /dev/null &
        chdir: /docker/compose/

  handlers:
    - name: clone_git
      shell: chdir=/docker/ rm -rf web && git clone git@192.168.1.12:root/web.git
    - name: fetch_git
      shell: chdir=/docker/web/ git fetch
...
- 更改钩子 jenkins 定义的构建指令
测试人员提交代码测试是否成功
测试人员 clone 代码并 push
git config --global user.email "1347054988@qq.com"
git config --global user.name "root"
git add .
git commit -m "v3"
git push
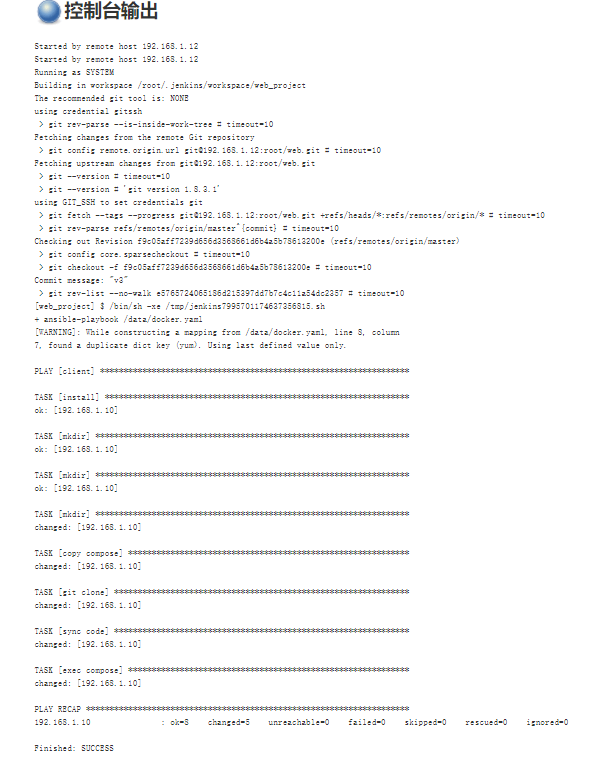
项目的控制台输出